注意(WARNING):本文含有大量AOSP源码,阅读过程中如出现头晕、目眩、恶心、犯困等症状属正常情况,作者本人亦无法避免症状产生,故不承担任何法律责任。
本文所贴源码全部来自 Android API 29 Platform,即 Android 10.0。
阅读本文需要有一定的C/C++基础。
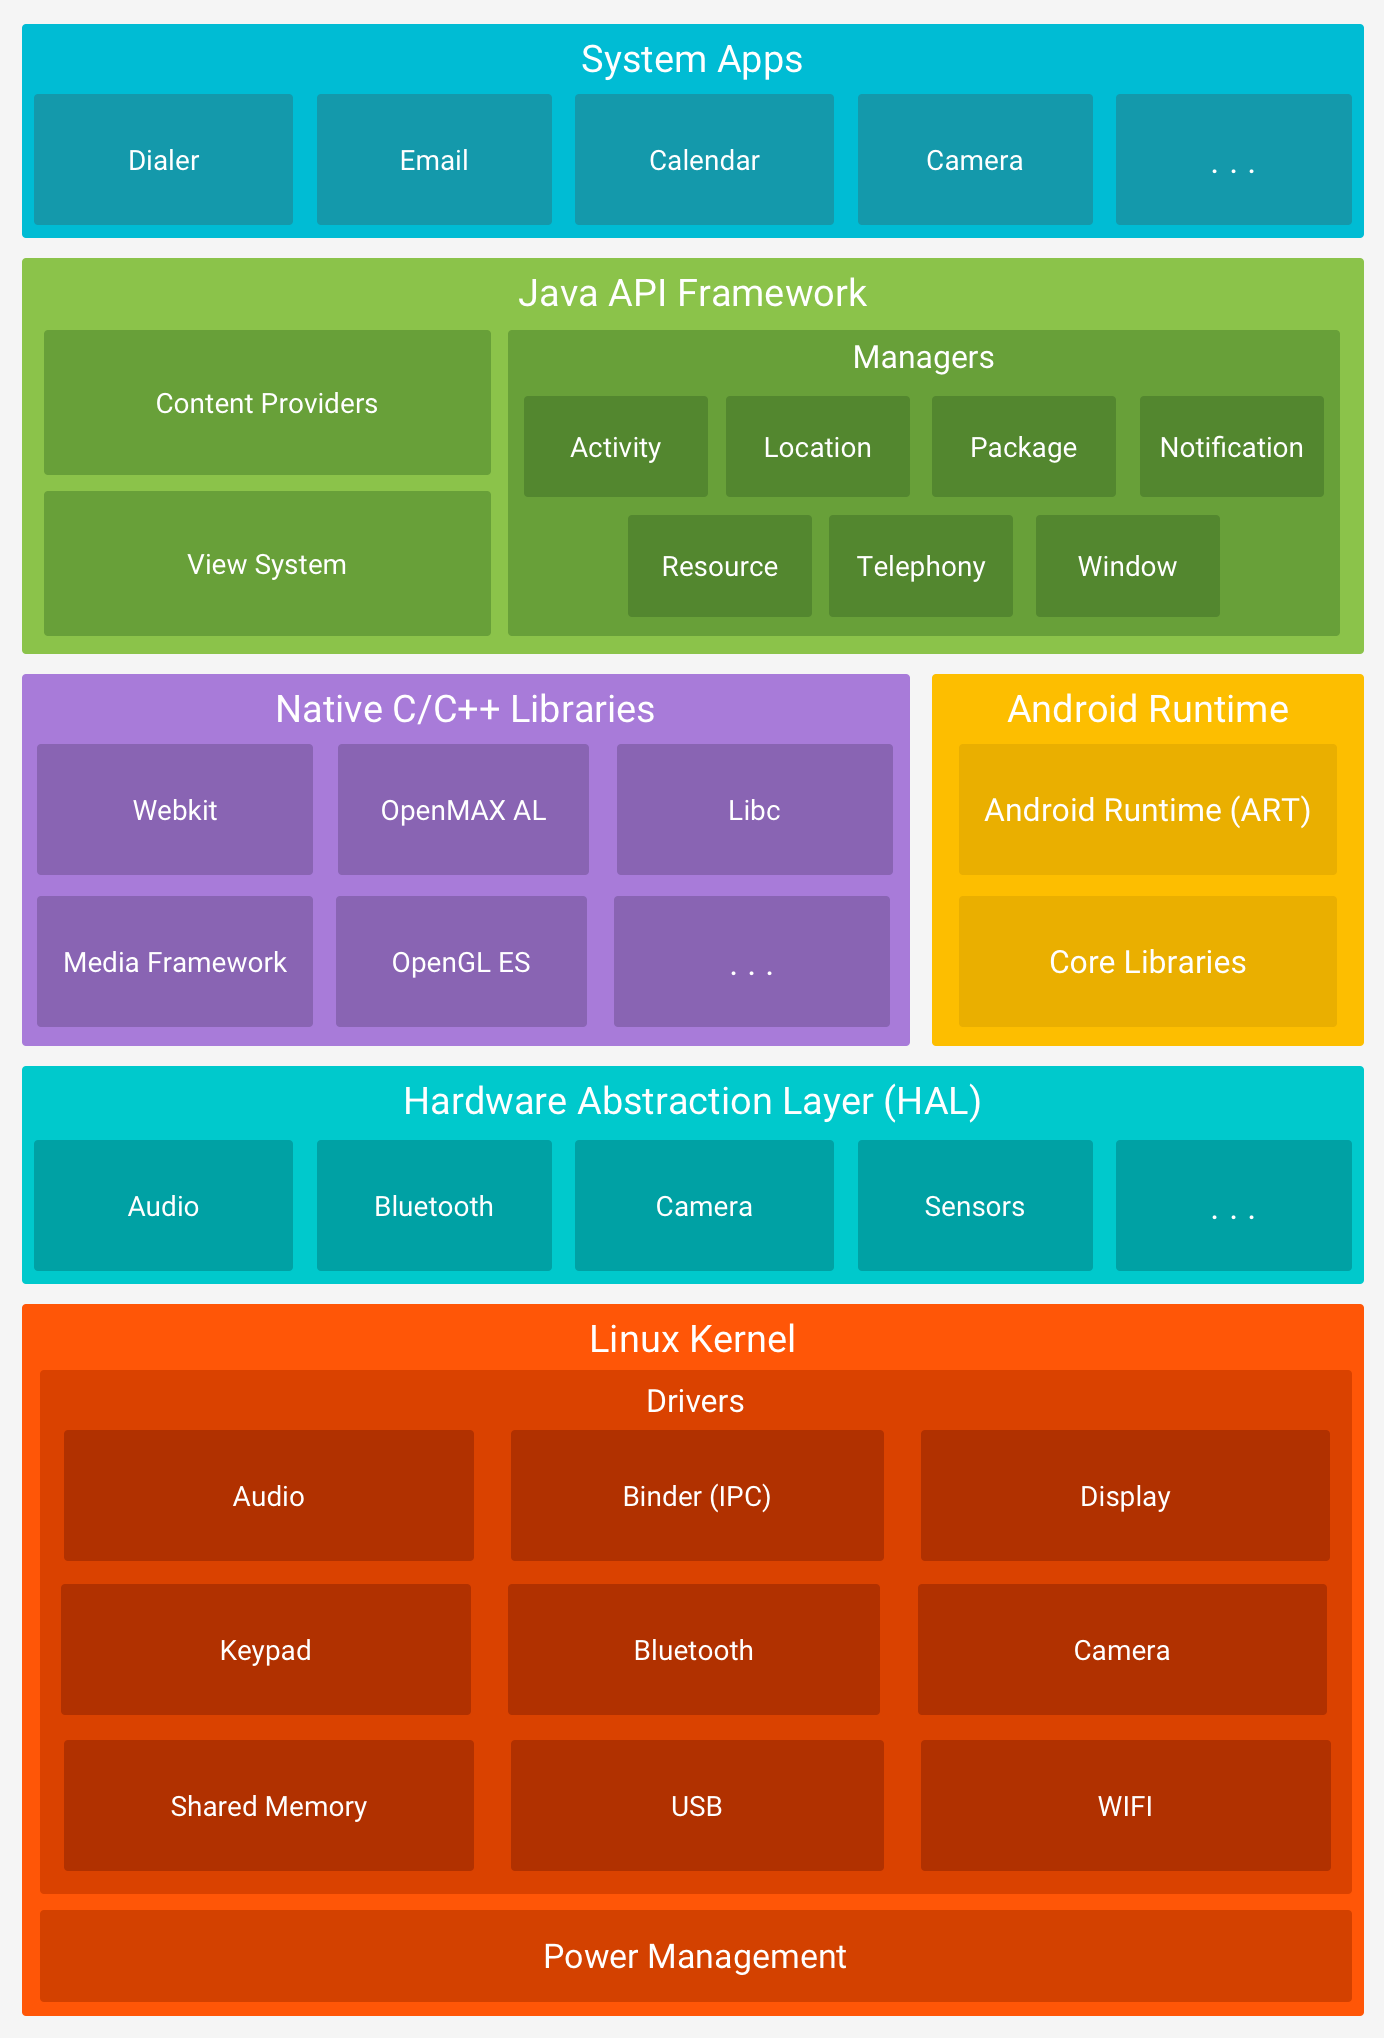
Android系统架构 当我们看到”Android系统架构 “这几个字时,通常会联想到Google官方发布的五层系统架构图,如下所示。
通过这张图我们可以理解Android系统如何分层以及各层功能职责,不过对于各层的运行细节、层与层之间如何进行通信和配合工作等我们还是无法得知。
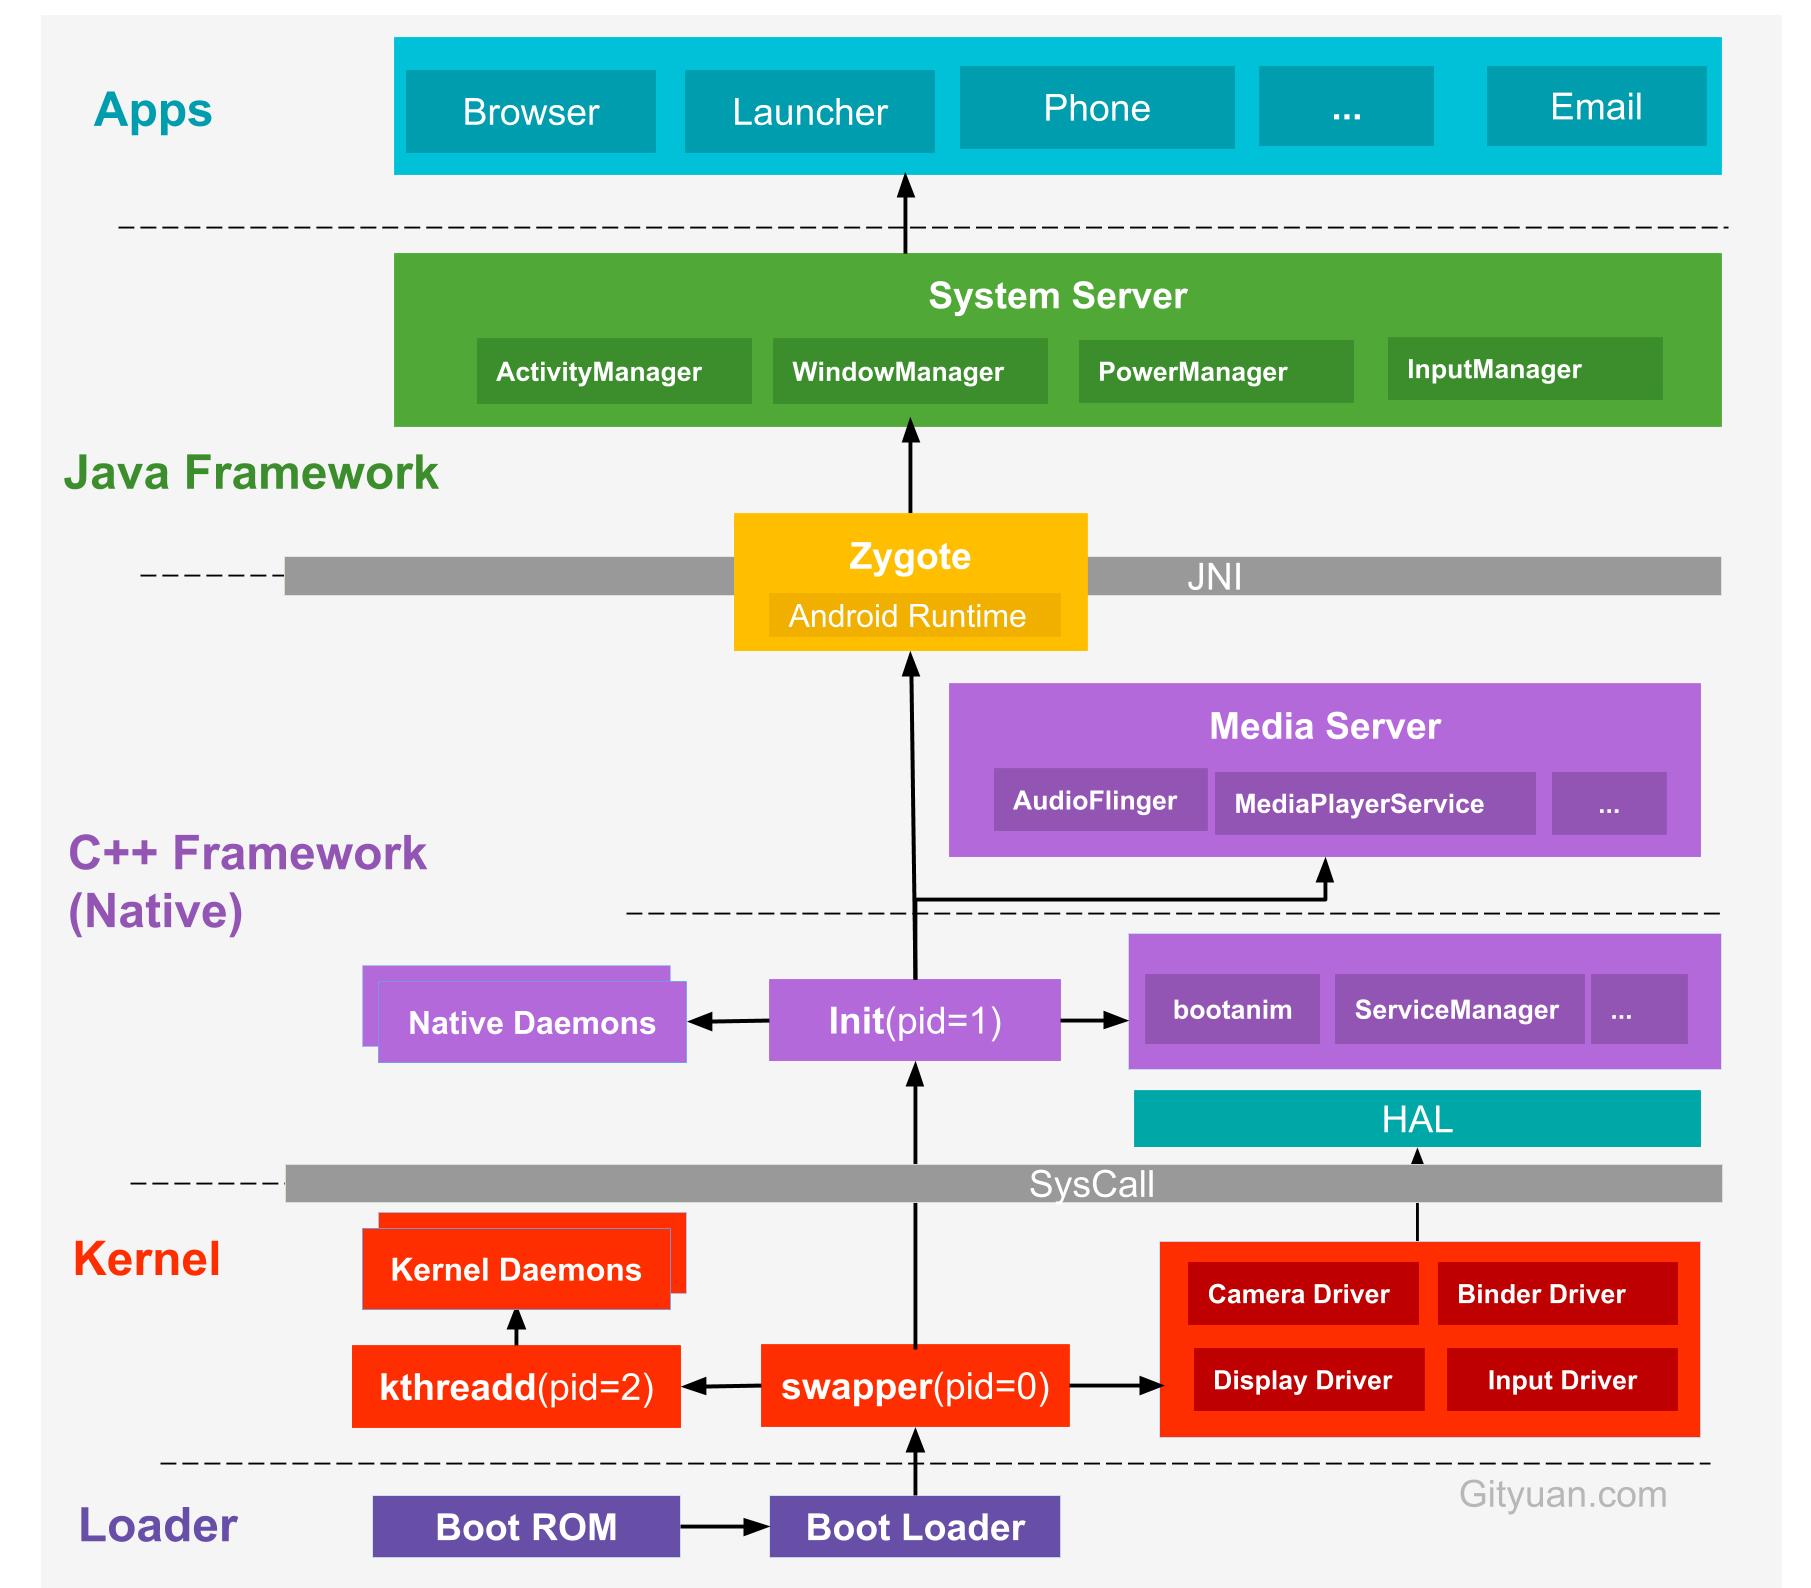
为了窥探Android系统的全貌,我们可以从一些关键进程的启动入手,分析Android内部的环环相扣的内在联系。
这里借用gityuan 大佬的一张图:
从上图我们可以看到整个系统启动中有几个关键进程:
Init进程
Zygote进程
System Server进程
应用程序进程
下面我们根据这些进程的启动顺序来分析各进程的启动过程以及其主要工作,为了防止篇幅过长,应用程序进程将会在后面的文章单独分析。
Init进程 要了解Init进程,首先要知道Android系统的启动过程,分为几个步骤:
启动电源以及系统系统:当电源按下时引导芯片代码从预定义的地方(固化在 ROM)开始执行。加载引导程序BootLoader到RAM中,然后执行。
引导程序BootLoader:引导程序BootLoader是在Android操作系统开始运行前的一个小程序,它的主要作用是把系统OS拉起来并运行。
Linux Kernel启动:当内核启动时,设置缓存、被保护存储器、计划列表、加载驱动。在内核完成系统设置后,它首先在系统文件中寻找init.rc文件,并启动init进程。
Init 进程启动:init进程做的工作比较多 ,主要用来初始化和启动属性服务,也用来启动 Zygote 进程。
Init进程是Linux系统中用户空间的第一个进程,pid固定为1。
Init进程的入口函数 Init进程启动后执行其main方法,对应源码在 system/core/init/main.cpp 文件中:
1 2 3 4 5 6 7 8 9 10 11 12 13 14 15 16 17 18 19 20 21 22 23 24 25 26 27 28 29 30 31 32 33 34 35 36 37 38 39 40 41 42 43 44 45 46 47 48 49 50 51 52 53 54 55 56 57 58 59 60 61 62 63 64 65 66 67 68 69 70 71 72 73 74 75 76 77 78 79 80 81 82 83 84 85 86 87 88 89 90 91 92 93 94 95 96 97 98 99 100 101 102 103 104 105 106 107 108 109 110 int main (int argc, char ** argv) #if __has_feature(address_sanitizer) #endif 0 , -20 );if (!strcmp (basename(argv[0 ]), "ueventd" )) {return ueventd_main(argc, argv);if (argc > 1 ) {if (!strcmp (argv[1 ], "subcontext" )) {const BuiltinFunctionMap& function_map = GetBuiltinFunctionMap();return SubcontextMain(argc, argv, &function_map);if (!strcmp (argv[1 ], "selinux_setup" )) {return SetupSelinux(argv);if (!strcmp (argv[1 ], "second_stage" )) {return SecondStageMain(argc, argv);return FirstStageMain(argc, argv);int FirstStagetMain (int argc, char ** argv) if (REBOOT_BOOTLOADER_ON_PANIC) {"tmpfs" , "/dev" , "tmpfs" , MS_NOSUID, "mode=0755" ));"/dev/pts" , 0755 ));"/dev/socket" , 0755 ));"devpts" , "/dev/pts" , "devpts" , 0 , NULL ));#define MAKE_STR(x) __STRING(x) "proc" , "/proc" , "proc" , 0 , "hidepid=2,gid=" MAKE_STR(AID_READPROC)));const char * path = "/system/bin/init" ;const char * args[] = {path, "selinux_setup" , nullptr };const_cast <char **>(args));int SetupSelinux (char ** argv) const char * path = "/system/bin/init" ;const char * args[] = {path, "second_stage" , nullptr };const_cast <char **>(args));int SecondStageMain (int argc, char ** argv) return 0 ;static void LoadBootScripts (ActionManager& action_manager, ServiceList& service_list) std ::string bootscript = GetProperty("ro.boot.init_rc" , "" );if (bootscript.empty()) {"/init.rc" );
main方法中通过判断参数个数以及类型来执行对应的代码,主要分为两个阶段的工作:
第一阶段(FirstStageMain) :
ueventd/watchdogd跳转及环境变量设置
挂载文件系统并创建目录
初始化日志输出、挂载分区设备
启用SELinux安全策略
初始化内核log系统
第二阶段(SecondStageMain) :
创建进程会话密钥并初始化属性系统
执行SELinux第二阶段并恢复一些文件安全上下文
新建epoll并初始化子进程终止信号处理函数
设置其他系统属性并开启属性服务
解析init.rc脚本文件,启动Zygote进程和其它进程
解析init.rc文件 init.rc是一个配置文件,内部是由Android初始化语言编写的脚本,主要包含五种类型语句:
Action
Command
Service
Option
Import
我们只需要关注service命令即可。service命令可以开启一个服务,格式如下:
service <name><pathname> [<argument>]* <option> <option>
参数含义如下表所示。
参数
含义
<name>
表示此服务的名称
<pathname>
服务所在路径
<argument>
启动服务所带的参数
<option>
对此服务的约束选项
Init进程在解析init.rc文件时,会创建和启动service命令指定的进程,其中Zygote进程就是这样被启动的。
init.rc文件中通过import来导入对应Zygote的rc文件,主流厂商使用的是init.zygote64_32.rc,完整路径如下:
system/core/rootdir/init.zygote64_32.rc
1
2
3
4
5
6
7
8
9
10
11
12
13
14
15
16
17
18
19
20
21
22
23
24
25
26
service zygote /system/bin/app_process64 -Xzygote /system/bin --zygote --start-system-server --socket-name=zygote
下面我们来分析下这段脚本。
Zygote进程 init.zygote64_32.rc文件包含两个service指令,对应两个Zygote进程。
第一个Zygote进程 第一个Zygote进程的进程名为zygote,进程通过/system/bin/app_process64来启动,并且会创建一个名为zygote的socket。
对应脚本:
1
2
3
4
5
6
7
8
9
10
11
12
13
14
15
16
service zygote /system/bin/app_process64 -Xzygote /system/bin --zygote --start-system-server --socket-name=zygote
通过执行进行/system/bin/app_process64并传入4个参数启动Zygote进程,这五个参数分别是:
-Xzygote:该参数将作为虚拟机启动时所需的参数
/system/bin:代表虚拟机程序所在目录
–zygote:指明以ZygoteInit.java类中的main函数作为虚拟机执行入口
–start-system-server:告诉Zygote进程启动systemServe进程
–socket-name:指定socket的名字
第二个Zygote进程 第一个Zygote进程的进程名为zygote_secondary,进程通过/system/bin/app_process32来启动,并且会创建一个名为zygote_secondary的socket。
对应脚本:
1
2
3
4
5
6
7
8
9
service zygote_secondary /system/bin/app_process32 -Xzygote /system/bin --zygote --socket-name=zygote_secondary --enable-lazy-preload
可以看到Zygote进程通过/system/bin/app_process64和/system/bin/app_process32来启动,入口函数位于frameworks/base/cmds/app_process/app_main.cpp中。
Zygote进程入口函数
frameworks/base/cmds/app_process/app_main.cpp
1
2
3
4
5
6
7
8
9
10
11
12
13
14
15
16
17
18
19
20
21
22
23
24
25
26
27
28
29
30
31
32
33
34
35
36
37
38
39
40
41
42
43
44
45
46
47
48
49
50
51
52
int main (int argc, char * const argv[]) AppRuntime runtime (argv[0 ], computeArgBlockSize(argc, argv)) ;bool zygote = false ; bool startSystemServer = false ; bool application = false ; while (i < argc) {const char * arg = argv[i++];if (strcmp (arg, "--zygote" ) == 0 ) {true ;else if (strcmp (arg, "--start-system-server" ) == 0 ) {true ;else if (strcmp (arg, "--application" ) == 0 ) {true ;else if (strncmp (arg, "--nice-name=" , 12 ) == 0 ) {12 );else if (strncmp (arg, "--" , 2 ) != 0 ) {break ;else {break ;if (zygote) {"com.android.internal.os.ZygoteInit" , args, zygote);else if (className) {"com.android.internal.os.RuntimeInit" , args, zygote);else {fprintf (stderr , "Error: no class name or --zygote supplied.\n" );"app_process: no class name or --zygote supplied." );
main方法中主要是创建了一个AppRuntime对象,然后根据传入的参数判断当前进程类型,可能为Zygote或者应用进程,本次流程为Zygote进程。最后进行参数的拼接,调用AppRuntime.start方法启动虚拟机并传入参数。
AppRuntime#start AppRuntime继承自AndroidRuntime,start方法定义在AndroidRuntime中,先看看此方法的注释以及声明:
1 2 3 4 5 6 7 8 9 void AndroidRuntime::start (const char * className, const Vector<String8>& options, bool zygote)
通过注释我们知道这个方法主要干了两件事:
启动Dalvik虚拟机
调用”static void main(String[] args)“方法
下面来过一过源码。
frameworks/base/core/jni/AndroidRuntime.cpp
1
2
3
4
5
6
7
8
9
10
11
12
13
14
15
16
17
18
19
20
21
22
23
24
25
26
27
28
29
30
31
32
33
34
35
36
37
38
39
40
41
42
43
44
45
46
47
48
49
50
51
52
53
54
55
56
57
58
59
60
61
62
63
64
65
66
67
68
69
70
71
72
73
74
75
76
77
78
void AndroidRuntime::start (const char * className, const Vector<String8>& options, bool zygote) NULL );if (startVm(&mJavaVM, &env, zygote, primary_zygote) != 0 ) {return ;if (startReg(env) < 0 ) {"Unable to register all android natives\n" );return ;"java/lang/String" );NULL );1 , stringClass, NULL );NULL );NULL );0 , classNameStr);for (size_t i = 0 ; i < options.size(); ++i) {string ());NULL );1 , optionsStr);char * slashClassName = toSlashClassName(className != NULL ? className : "" );if (startClass == NULL ) {"JavaVM unable to locate class '%s'\n" , slashClassName);else {"main" ,"([Ljava/lang/String;)V" );if (startMeth == NULL ) {"JavaVM unable to find main() in '%s'\n" , className);else {#if 0 if (env->ExceptionCheck())#endif free (slashClassName);"Shutting down VM\n" );if (mJavaVM->DetachCurrentThread() != JNI_OK)"Warning: unable to detach main thread\n" );if (mJavaVM->DestroyJavaVM() != 0 )"Warning: VM did not shut down cleanly\n" );
这段代码配合注释还是很容易理解的,首先初始化了JNI服务,然后启动了Dalvik虚拟机,最后根据传入的className,使用JNI方式调用ZygoteInit#main方法。
ZygoteInit#main 代码执行到这里的时候,我们已经从晦涩的C++世界进入了熟悉的Java世界中。
来到ZygoteInit.java类,找到对应的Java main方法,此方法的主要工作为:
预加载类和资源
创建服务端Socket
启动SystemServer进程
开启循环,等待客户端请求
下面通过源码来分析这四个步骤。
frameworks/base/core/java/com/android/internal/os/ZygoteInit.java
1
2
3
4
5
6
7
8
9
10
11
12
13
14
15
16
17
18
19
20
21
22
23
24
25
26
27
28
29
30
31
32
33
34
35
36
37
38
39
40
41
42
43
44
45
46
47
48
49
50
51
52
53
54
55
56
57
58
59
60
61
62
63
64
65
66
67
68
69
70
71
72
73
74
75
76
77
78
79
80
81
82
83
84
85
86
87
88
89
90
91
92
93
94
95
96
97
98
99
100
101
102
103
104
105
106
107
108
109
110
111
112
113
114
115
116
117
118
119
120
121
122
public static void main (String argv[]) null ;try {0 , 0 );catch (ErrnoException ex) {throw new RuntimeException("Failed to setpgid(0,0)" , ex);try {"Zygote64Timing" : "Zygote32Timing" ;new TimingsTraceLog(bootTimeTag,"ZygoteInit" );boolean startSystemServer = false ;"zygote" ;null ;boolean enableLazyPreload = false ;for (int i = 1 ; i < argv.length; i++) {if ("start-system-server" .equals(argv[i])) {true ;else if ("--enable-lazy-preload" .equals(argv[i])) {true ;else if (argv[i].startsWith(ABI_LIST_ARG)) {else if (argv[i].startsWith(SOCKET_NAME_ARG)) {else {throw new RuntimeException("Unknown command line argument: " + argv[i]);final boolean isPrimaryZygote = zygoteSocketName.equals(Zygote.PRIMARY_SOCKET_NAME);if (abiList == null ) {throw new RuntimeException("No ABI list supplied." );if (!enableLazyPreload) {"ZygotePreload" );else {"PostZygoteInitGC" );false , 0 );new ZygoteServer(isPrimaryZygote);if (startSystemServer) {if (r != null ) {return ;"Accepting command socket connections" );catch (Throwable ex) {"System zygote died with exception" , ex);throw ex;finally {if (zygoteServer != null ) {if (caller != null ) {
可以看到Zygote实际上也是采用的C/S结构,它首先会使用预加载机制加载一些公
然后通过ZygoteServer来创建本地服务端的socket,用于与其他进程通信。
在第一次启动时它会通过fork自身的方式启动SystemServer进程,然后会一直等待子进程Socket请求请求,通过fork zygote可以快速创建一个已经初始化好的”Java 世界进程“,这也是Zygote名称的由来。
下面我们来看看预加载方法。
ZygoteInit#preLoad preLoad中大量使用了systrace来监控方法执行性能,这里我将它们去除掉了,源码如下:
1
2
3
4
5
6
7
8
9
10
11
12
13
14
15
16
17
18
19
20
21
22
23
24
25
26
27
28
29
30
31
32
33
34
35
static void preload (TimingsTraceLog bootTimingsTraceLog) true ;
这些预加载的类都是Android中的一些关键类,整个列表定义在frameworks/base/config/preloaded-classes中,Android 10中一共有1万多个。资源主要是加载framework-res.apk中的资源、openGL以及WebView等,我们经常用的android.R文件就是来自这里。
预加载的好处是在fork创建子进程时无需再次创建这些类和资源,只需复制即可。
ZygoteInit#forkSystemServer 1 2 3 4 5 6 7 8 9 10 11 12 13 14 15 16 17 18 19 20 21 22 23 24 25 26 27 28 29 30 31 32 33 34 35 36 37 38 39 40 41 42 43 44 45 46 47 48 49 50 51 52 53 54 55 56 57 58 59 60 61 62 63 64 65 66 67 68 69 70 71 private static Runnable forkSystemServer (String abiList, String socketName, ZygoteServer zygoteServer) int pid;try {new ZygoteCommandBuffer(args);try {catch (EOFException e) {throw new AssertionError("Unexpected argument error for forking system server" , e);if (Zygote.nativeSupportsMemoryTagging()) {"arm64.memtag.process.system_server" , "async" );if (mode.equals("async" )) {else if (mode.equals("sync" )) {else if (!mode.equals("off" )) {"Unknown memory tag level for the system server: \"" + mode + "\"" );else if (Zygote.nativeSupportsTaggedPointers()) {if (shouldProfileSystemServer()) {null ,catch (IllegalArgumentException ex) {throw new RuntimeException(ex);if (pid == 0 ) {if (hasSecondZygote(abiList)) {return handleSystemServerProcess(parsedArgs);return null ;
forkSystemServer方法将会采用JNI的方式调用nativeForkSystemServer方法来创建子进程。在子进程中调用handleSystemServerProcess方法,会返回一个Runnale对象,通过调用这个Runnable的run方法来执行SystemServer的main方法。
ZygoteServer#runSelectLoop 在创建完SystemServer之后,Zygote的前置工作就已经完成,接下来将会进入无限循环中,等待SystemServer通知它创建App进程。runSelectLoop的源码较为复杂,这里做了大量精简,我们只需要关注关键方法即可。
frameworks/base/core/java/com/android/internal/os/ZygoteServer.java
1 2 3 4 5 6 7 8 9 10 11 12 13 14 15 16 17 18 19 20 21 22 23 24 25 26 27 28 29 30 31 32 33 34 35 36 37 Runnable runSelectLoop (String abiList) {try {1 );catch (ErrnoException ex) {throw new RuntimeException("poll failed" , ex);boolean usapPoolFDRead = false ;while (--pollIndex >= 0 ) {if ((pollFDs[pollIndex].revents & POLLIN) == 0 ) {continue ;if (pollIndex == 0 ) {else if (pollIndex < usapPoolEventFDIndex) {try {final Runnable command = connection.processOneCommand(this );
ZygoteConnection#processOneCommand
frameworks/base/core/java/com/android/internal/os/ZygoteConnection.java
1 2 3 4 5 6 7 8 9 10 11 12 13 14 15 16 17 18 19 20 21 22 23 Runnable processOneCommand (ZygoteServer zygoteServer) {if (pid == 0 ) {return handleChildProc(parsedArgs, descriptors, childPipeFd,else {return null ;
ZygoteConnection#handleChildProc
frameworks/base/core/java/com/android/internal/os/ZygoteConnection.java
1 2 3 4 5 6 7 8 9 10 11 12 13 14 15 16 17 18 19 20 21 22 23 24 25 26 27 28 29 30 private Runnable handleChildProc (ZygoteArguments parsedArgs, FileDescriptor pipeFd, boolean isZygote) if (parsedArgs.mInvokeWith != null ) {throw new IllegalStateException("WrapperInit.execApplication unexpectedly returned" );else {if (!isZygote) {return ZygoteInit.zygoteInit(parsedArgs.mTargetSdkVersion,null );else {return ZygoteInit.childZygoteInit(
小结 Zygote进程所做的工作有点多,我们来总结一下它的主要工作流程。
启动Android系统中第一个Java虚拟机,并且初始化了JNI,注册了Android中的JNI函数。
调用Java层ZygoteInit类的main函数,进入Java世界。
建立Socket服务端,用于与客户端进行IPC通信,主要是接收SystemServer的启动App进程请求。
预加载类、资源、Webview等。
通过fork自身的方式,启动SystemServer进程。
调用runSelectLoopMode方法,进入无限循环,等待创建子进程的请求。
System Server进程 SystemServer进程主要用于创建系统服务,我们熟知的 AMS、ATMS、WMS 和 PMS 都是由它来创建的,其进程名为“system_server”。
下面就继续跟踪上节的ZygoteInit#handleSystemServerProcess方法来分析SystemServer的工作流程。
ZygoteInit#handleSystemServerProcess
frameworks/base/core/java/com/android/internal/os/ZygoteInit.java
1 2 3 4 5 6 7 8 9 10 11 12 13 14 15 16 17 18 19 20 21 22 23 24 25 26 27 28 29 30 31 32 33 34 35 36 37 private static Runnable handleSystemServerProcess (ZygoteArguments parsedArgs) if (parsedArgs.mInvokeWith != null ) {if (systemServerClasspath != null ) {new String[args.length + 2 ];0 ] = "-cp" ;1 ] = systemServerClasspath;0 , amendedArgs, 2 , args.length);null , args);throw new IllegalStateException("Unexpected return from WrapperInit.execApplication" );else {null ;if (systemServerClasspath != null ) return ZygoteInit.zygoteInit(parsedArgs.mTargetSdkVersion,
这里要注意的是,PathClassLoader在这里被创建。
接着调用了ZygoteInit#zygoteInit方法。
ZygoteInit#zygoteInit zygoteInit方法接收3个参数:
targetSdkVersion:系统设置的目标SDK版本
disabledCompatChanges:禁用的一些兼容选项
argv:传递给虚拟机的启动参数,也就是main方法接收到的参数
源码如下:
frameworks/base/core/java/com/android/internal/os/ZygoteInit.java
1 2 3 4 5 6 7 8 9 10 11 12 13 14 15 16 17 public static Runnable zygoteInit (int targetSdkVersion, long [] disabledCompatChanges, String[] argv, ClassLoader classLoader) if (RuntimeInit.DEBUG) {"RuntimeInit: Starting application from zygote" );"ZygoteInit" );return RuntimeInit.applicationInit(targetSdkVersion, disabledCompatChanges, argv,
此方法中有两个关键方法,已在代码中标明,下面就来分析下这两个方法。
ZygoteInit#nativeZygoteInit nativeZygotelnit是一个Native方法,因此我们先要了解它对应的JNI文件,源码中的JNI文件都可以在 frameworks/base/core/jni 目录中找到。
frameworks/base/core/jni/AndroidRuntime.cpp
1 2 3 4 5 6 7 8 9 int register_com_android_internal_os_ZygoteInit_nativeZygoteInit (JNIEnv* env) const JNINativeMethod methods[] = {"nativeZygoteInit" , "()V" ,void *) com_android_internal_os_ZygoteInit_nativeZygoteInit },return jniRegisterNativeMethods(env, "com/android/internal/os/ZygoteInit" ,
通过JNI的gMethods数组,可以看出nativeZygotelnit方法对应的是JNI文件AndroidRuntime.cpp的com_android_internal_os_zygotelnit_nativeZygotelnit函数:
frameworks/base/core/jni/AndroidRuntime.cpp
1 2 3 4 5 6 static AndroidRuntime* gCurRuntime = NULL ;static void com_android_internal_os_ZygoteInit_nativeZygoteInit (JNIEnv* env, jobject clazz)
可以看到gCurRuntime是AndroidRuntime的指针,指向的是子类AppRuntime,实际调用的是AppRuntime中的onZygoteInit方法:
frameworks/base/cmds/app_process/app_main.cpp
1 2 3 4 5 6 7 virtual void onZygoteInit () "App process: starting thread pool.\n" );
代码中调用了ProcessState#startThreadPool 方法来启动Binder线程池,这里就不再深入了。
RuntimeInit#applicationInit applicationInit方法主要是设置虚拟机的TargetSDKVersion,并且通过传递过来的参数找到并启动Java Main方法。
frameworks/base/core/java/com/android/internal/os/RuntimeInit.java
1 2 3 4 5 6 7 8 9 10 11 12 protected static Runnable applicationInit (int targetSdkVersion, long [] disabledCompatChanges, String[] argv, ClassLoader classLoader) true );final Arguments args = new Arguments(argv);return findStaticMain(args.startClass, args.startArgs, classLoader);
RuntimeInit#findStaticMain findStaticMain使用反射创建的入口类,并调用main方法,注意这里的ClassLoader是我们上面提到过的PathClassLoader。
frameworks/base/core/java/com/android/internal/os/RuntimeInit.java
1 2 3 4 5 6 7 8 9 10 11 12 13 14 15 16 17 18 19 20 21 22 23 24 25 26 27 28 29 30 31 32 33 34 35 36 37 protected static Runnable findStaticMain (String className, String[] argv, ClassLoader classLoader) try {true , classLoader);catch (ClassNotFoundException ex) {throw new RuntimeException("Missing class when invoking static main " + className,try {"main" , new Class[] { String[].class });catch (NoSuchMethodException ex) {throw new RuntimeException("Missing static main on " + className, ex);catch (SecurityException ex) {throw new RuntimeException("Problem getting static main on " + className, ex);int modifiers = m.getModifiers();if (! (Modifier.isStatic(modifiers) && Modifier.isPublic(modifiers))) {throw new RuntimeException("Main method is not public and static on " + className);return new MethodAndArgsCaller(m, argv);
方法返回了一个MethodAndArgsCaller对象,MethodAndArgsCaller是一个Runnable,它主要是调用了传入的Method对象,并将异常都强转为了RuntimeException和Error。
MethodAndArgsCaller将会返回到ZygoteInit#main方法中执行,接下来就进入了SystemServer.java的main方法中。
SystemServer#main SystemServer的入口main函数位于SystemServer.java中。
frameworks/base/services/java/com/android/server/SystemServer.java
1 2 3 public static void main (String[] args) new SystemServer().run();
main方法只是常见了一个SystemServer对象并调用其run方法。
frameworks/base/services/java/com/android/server/SystemServer.java
1 2 3 4 5 6 7 8 9 10 11 12 13 14 15 16 17 18 19 20 21 22 23 24 25 26 27 28 29 30 31 32 33 34 35 36 37 38 39 40 41 42 43 44 45 46 47 48 49 50 51 52 53 54 55 56 57 58 59 60 61 62 63 64 65 66 67 68 69 70 71 72 73 74 75 76 77 78 79 80 81 82 83 84 85 private void run () new TimingsTraceAndSlog();try {"InitBeforeStartServices" );false );true ;"android_servers" );if (Build.IS_DEBUGGABLE) {new SystemServiceManager(mSystemContext);if (Build.IS_DEBUGGABLE) {try {"StartServices" );catch (Throwable ex) {"System" , "******************************************" );"System" , "************ Failure starting system services" , ex);throw ex;finally {throw new RuntimeException("Main thread loop unexpectedly exited" );
createSystemContext用于创建系统上下文,此方法中首先会创建ActivityThread对象,并且调用ActivityThread#attach方法,然后通过ActivityThread对象来构建SystemContext。
在启动服务之前,方法中首先创建了SystemServiceManager,由它负责创建、启动和管理服务。
接着通过三个方法来分别启动不同类型的服务:
startBootstrapServices:启动引导服务,包括Installer、ActivityManagerService、ActivityTaskManagerService、PackageManagerService等。
startCoreServices:启动核心服务,包括SystemConfigService、BatteryService、UsageStatsService、WebViewUpdateService等。
startOtherServices:启动其他服务,包括NetworkManagementService、NetworkStatsService、InputManagerService、TelephonyRegistry等。
实际上每个方法负责启动的服务还有很多,这里只是举例了几个常用的服务。
这些服务的启动逻辑是相似的,这里以Android 10新增的ActivityTaskManagerService为例,来演示一遍服务启动流程:
1 2 3 4 ActivityTaskManagerService atm =
ActivityTaskManagerService的静态内部类Lifecycle继承自SystemService,其构造方法中会创建外部类ActivityTaskManagerService的实例。
SystemServiceManager#startService
frameworks/base/services/core/java/com/android/server/SystemServiceManager.java
1 2 3 4 5 6 7 8 9 10 11 12 13 14 15 private final ArrayList<SystemService> mServices = new ArrayList<SystemService>(); public void startService (@NonNull final SystemService service) long time = SystemClock.elapsedRealtime();try {catch (RuntimeException ex) {throw new RuntimeException("Failed to start service " + service.getClass().getName()": onStart threw an exception" , ex);"onStart" );
ActivityTaskService.Lifecycle#onStart
frameworks/base/services/core/java/com/android/server/wm/ActivityTaskManagerService.java
1 2 3 4 5 6 7 8 9 10 11 12 public void onStart () private void start ()
此方法做了两件事:
将ActivityTaskManagerService对象注册到ServiceManager中,其他进程通过访问ServiceManager来获取ActivityTaskManagerService的代理对象。
将ActivityTaskManagerService的内部类LocalService添加到本地服务列表,LocalService不是一个IBinder对象,它用于当前进程内部使用ATMS服务。
小结 我们来总结一下SystemServer进程被创建后所做的工作:
启动Binder线程池,用于与其他进程进行Bind通信。
创建SystemServiceManager,用于启动、创建和管理服务。
启动各种系统服务,分为引导服务、核心服务和其他服务。
问题 下面通过几个问题来结束此篇又臭又长的文章。
Q:系统服务何时启动?如何启动? A:在SystemServer进程启动时,会分批启动所有系统服务。
通过SystemServiceManager#startService来启动一个服务,服务启动后需要注册到ServiceManager中,其他进程访问ServiceManager来获取服务的代理对象。
Q:什么是Zygote预加载? A:预加载是指在Zygote进程启动的时候就加载一些类库和资源文件,这样系统只需要在第一次启动Zygote时加载这些共用的资源,子进程创建时只需要复用即可无需再次加载。
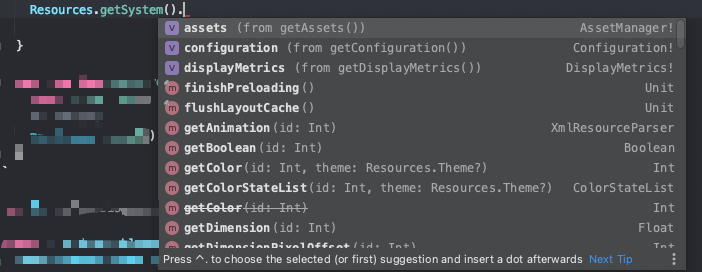
这些资源被保存到全局变量Resources中,它是一个全局静态变量,可以通过 Resources.getSystem() 来使用它。
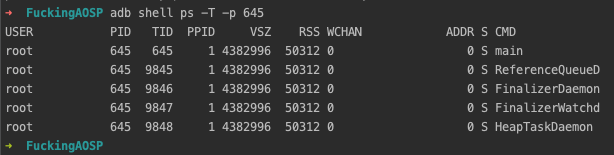
Q:系统中有几个Zygote进程? A:按照我们上面的源码分析,系统中有两个Zygote进程,进程名分别为zygote和zygote64。
但如果我们使用adb shell ps查看真机上的进程时,会发现多了一个名为webview_zygote的进程,有时候还会有一个名为App包名_zygote的进程。
这两个进程实际上是由ZygoteProcess#startChildZygote创建而来,这些进程继承了Zygote中的数据,并且可以与Zygote连接。
创建它们的目的通常是明确的,例如WebViewZygtoe用于启动一个WebView进程。
不过按照通常意义来讲的Zygote进程最少一个最多两个。
Q:为什么SystemServer与Zygote进程之间的通信采用Unix Domain Sockt而不是Binder? A:关键的原因有:
fork采用的是CopyOnWrite机制,由于可能存在的死锁问题,Unix禁止fork多线程程序。Zygote当然也是多线程的,除了主线程外还有4条守护线程,每次fork前都需要停止这些线程,待fork结束后重新执行。
Zygote进程先于SystemServer创建,如果要使用Binder,那么需要等待SystemServer创建完成之后再向SystemServer注册Binder服务,这里需要额外的同步操作。
Binder机制是需要建立Binder线程池的,代理对象对Binder的调用是在Binder线程池中,在通过线程间通信通知主线程。
例如Activity启动时,AMS的本地代理IApplicationThread运行在Binder线程池中,处理完毕后通过Handler通知ActivityThread来执行启动Activity的流程。
Zygote本身只需与SystemServer以及子Zygote进程通信,并不依赖多线程来提升性能,若使用Binder反而增加了Zygote中的线程数,使得性能下降。
SystemServer不受到此限制,它并不需要fork自身来创建子进程,所以它会在第一时间初始化Binder线程池。
参考