之前的协程文章中并没有采用字节码来分析,原因一是当时对字节码不是很熟悉,二是不好用一个更难的概念来解释一个没那么难的概念。我们知道协程的关键实现都是由 kotlinc 即编译器来完成,而 IDE 反编译的代码阅读性很差,那么现在学习了字节码之后就可以通过 javap 来一探究竟了。
suspend function kotlin协程的”黑魔法“基础是 suspend 关键字,先来这个方法看看背后做了什么:
1
2
3
4
5
6
7
8
suspend fun requestUserToken (userId: Int ) "faketoken" suspend fun fetchUserInfo (token: String ) 1000L )0 , "张三" )))
requestUserToken 方法虽然声明为 suspend,但并没有发生”事实上的挂起“ ,使用 javap 编译后字节码如下:
1
2
3
4
5
6
7
public static final java.lang.Object requestUserToken (int , kotlin.coroutines.Continuation<? super java.lang.String>) ;1 , locals=2 , args_size=2 2 : areturn
可以看到 requestUserToken 方法的实现并没有什么特殊,但是我们只定义了一个 int 型参数,而方法签名中多了一个参数,为Continuation类型,是这个挂起函数与普通函数的唯一区别了。至于这个 Continuation 对象的作用暂时还不知道,先来看另外一个方法。
fetchUserInfo 的字节码就比较多了,如下所示。
1
2
3
4
5
6
7
8
9
10
11
12
13
14
15
16
17
18
19
20
21
22
23
24
25
26
27
28
29
30
31
32
33
34
35
36
37
38
39
40
41
42
43
44
45
46
47
public static final java.lang.Object fetchUserInfo (java.lang.String, kotlin.coroutines.Continuation<? super com.sukaidev.fuckingaosp.UserInfo>) ;8 , locals=8 , args_size=2 0 : iconst_01 : istore_22 : iconst_03 : istore_34 : aload_15 : astore_36 : iconst_07 : istore 4 12 : dup13 : aload_320 : astore 5 22 : aload 5 27 : astore 6 29 : iconst_030 : istore 7 32 : iconst_033 : iconst_034 : aconst_null35 : aconst_null36 : iconst_040 : dup41 : aload 6 49 : bipush 31 51 : aconst_null55 : pop56 : nop57 : aload 5 62 : dup66 : if_acmpne 73 69 : aload_173 : areturn
方法同样有一个 Continuation 类型的入参,下面我们简称 completion,首先创建了一个 SafeContinuation 实例,然后调用 completion.intercepted 方法,接着调用了 SafeContinuation 的构造器,翻译成代码如下:
1 val safe = SafeContinuation(completion.intercepted())
接下来就是比较关键的地方,第37行创建了一个 CoroutineTestKt$fetchUserInfo$2$1 对象,并将SafeContinuation 对象作为参数传入,CoroutineTestKt$fetchUserInfo$2$1 是编译器自动生成的类,对应我们传入 suspendCoroutine 方法中传入 thread 方法中的 block lambda。
第52行调用了 TreadKt.thread 方法,创建了一个线程,并把 CoroutineTestKt$fetchUserInfo$2$1 对象作为参数传入。
第59行调用 SafeContinuation.getOrThrow 方法来获取结果,如果结果为 COROUTINE_SUSPENDED 则表示发生了挂起,然后会调用 DebugProbesKt.probeCoroutineSuspended 方法将 completion 传入,最后返回结果。
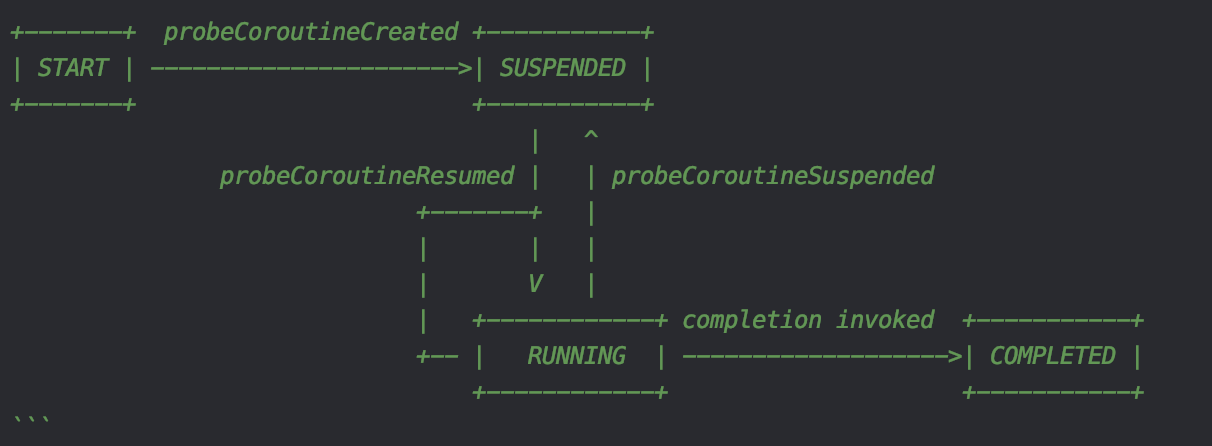
DebugProbes.kt类定义了几个用于debugger调试用的切面方法,主要用于调试器追踪协程,同时也可以替换Continuation实例。
probeCoroutineCreated:这个方法在createCoroutineUnintercepted中被调用,即我们每次调用createCoroutine时。
probeCoroutineResumed:这个方法在BaseContinuation#resumeWith中被调用。
probeCoroutineSuspended:在每次使用suspendCoroutineUninterceptedOrReturn来挂起协程时被调用。
另外 DebugProbes.kt文件中 的注释中提到了比较关键的一点:
Coroutines machinery implementation guarantees that the actual [frame] instance extends [BaseContinuationImpl] class, despite the fact that the declared type of [frame] parameter in this function is Continuation<*>. See [probeCoroutineCreated] for details.
即编译器会保证中间生成的Continuation对象是继承自BaseContinuationImpl的,而协程的结束回调则是直接继承Continuation的,这个与我们后文提到的协程出口有关系。
DebugProbes中还提供了协程的状态流转图:
这对我们理解协程的执行有帮助。
suspend main 在《深入理解Kotlin协程(一)——基本概念与原理》 一文中我们简单分析了可挂起的 main 函数的实现方式,下面就通过字节码来验证文中的分析过程。
以下面代码为例:
1
2
3
suspend fun main () "suspend main." )
编译后生成两个 class 文件,分别为 CoroutineTestKt.class 和 CoroutineTestKt$$$main.class。先来看看编译生成的 CoroutineTestKt$$$main.class 文件,这 class 文件的名字第一眼看过去觉得毫无头绪,为什么会有 3 个 $ 符号呢?
在上一篇文章 中我们讲过 Kotlin 中 Lambda 表达式的原理,其中说到了 kotlinc 生成的实现 Lambda 表达式的类的命名规则为:OuterClassName$OuterFunctionName$LambdaExpressionName$n 。我们把本例的 suspend man 方法代入会发现恰好符合这个规则。
我们猜到了 CoroutineTestKt$$$main 实际由 Lambda 表达式生成,继续来看 CoroutineTestKt$$$main.class 的字节码,发现该类确实继承自 Lambda 类,并且实现了 Function1 接口:
1 final class coroutine .CoroutineTestKt $$$main extends kotlin .jvm .internal .Lambda implements kotlin .jvm .functions .Function1
虽然验证了我们的猜想,但实际上我们并没有编写任何 Lambda 表达式,这显然编译器对 suspend main 做的特殊处理。既然实现了 Function1 接口,那么就来看下 invoke 方法是如何实现的:
1
2
3
4
5
6
7
8
9
10
public final java.lang.Object invoke (java.lang.Object) ;1 , locals=2 , args_size=2 0 : aload_17 : areturn
第 0~1 行将参数加载到栈中并强转为 Continuation 类型,然后调用了 CoroutineTestKt.main 方法将 Continuation 对象传入。
这里需要注意的是,invoke 方法携带一个 Continuation 类型的参数,跟我们上一节讨论的被 suspend 关键字修饰的方法(即挂起函数)是相同的,那么它也能作为一个挂起函数来使用。
CoroutineTestKt$$$main 中的字节码就只有 invoke 一个方法了,接下来就要去 CoroutineTestKt 中寻找哪个地方调用了 CoroutineTestKt$$$main.invoke 。先来看 Java 入口 main 方法:
1
2
3
4
5
6
7
8
9
10
11
12
public static void main (java.lang.String[]) 3 , locals=1 , args_size=1 3 : dup4 : aload_011 : return
main 方法中创建了 CoroutineTestKt$$$main 对象并且将其传给了 RunSuspendKt.runSuspend 方法,来看看这个方法做了什么:
1
2
3
4
5
internal fun runSuspend (block: suspend () -> Unit ) val run = RunSuspend()
这段代码已经很熟悉了,其实就是使用 suspend {} 代码块来启动一个协程,而这段协程的回调是 RunSuspend 对象,并且在启动协程后调用了 RunSuspend#await 方法。这个方法在《深入理解Kotlin协程(一)——基本概念与原理》 一文中已经分析了,这里再贴出它的代码:
1
2
3
4
5
6
7
8
9
10
11
12
13
14
15
16
17
override fun resumeWith (result: Result <Unit >) this ) {this .result = result@Suppress("PLATFORM_CLASS_MAPPED_TO_KOTLIN" ) (this as Object).notifyAll()fun await () this ) {while (true ) {when (val result = this .result) {null -> @Suppress("PLATFORM_CLASS_MAPPED_TO_KOTLIN" ) (this as Object).wait()else -> {return
实际上就是用 wait/notify 来控制虚拟机执行流程,等待协程运行完再退出。
而这个传进来的 suspend {} 代码块实际上就是 CoroutineTestKt.class 中的另一个 main 方法,这个方法包含了协程需要执行的所有代码,具体内容下节讨论。现在我们可以用伪代码来表示整个 suspend main 的被编译后的逻辑了:
1
2
3
4
5
6
7
8
9
10
11
fun main () val run = Runsuspend()suspend main{continuation ->
协程的启动和执行过程 上一节我们搞懂了 suspend main 背后的逻辑,知道其背后实际上是创建了一个简单协程,但对于这个协程的启动和执行过程还不太清楚,现在我们就通过一个例子来深入一下协程的执行流程。
1
2
3
4
5
6
7
8
9
10
11
12
13
14
15
16
17
18
19
suspend fun main () val token = requestUserToken(0 )"user token is : $token " )val userInfo = fetchUserInfo(token)"user info is : $userInfo " )suspend fun requestUserToken (userId: Int ) "faketoken" ))suspend fun fetchUserInfo (token: String ) 1000L )0 , "张三" )))data class UserInfo val userId: Int , val userName: String)
该例依然是通过 suspend main 构建的协程,其中 requestUserToken 和 fetchUserInfo 都是挂起函数。
通过上面的分析我们已经知道 suspend main 创建的协程体为 CoroutineTestKt.main 静态方法,此方法接收一个 Continuation 类型的参数。
1 public static final java.lang.Object main(kotlin.coroutines.Continuation<? super kotlin.Unit >);
那么这个参数是由谁传入的呢?回到上文中提到的 RunSuspendKt.runSuspend 方法:
1
2
3
4
5
6
internal fun runSuspend (block: suspend () -> Unit ) val run = RunSuspend()
此处的block 其实就是 CoroutineTestKt.main,继续跟进:
1 2 3 4 5 6 7 8 public fun <T> (suspend () Unit )
在 intrinsicsJvm.kt 文件中可以看到 createCoroutineUnintercepted 的实现:
1 2 3 4 5 6 7 8 9 10 11 12 13 14 @SinceKotlin("1.3" ) public actual fun <T> (suspend () Unit > {val probeCompletion = probeCoroutineCreated(completion)return if (this is BaseContinuationImpl)else this as Function1<Continuation<T>, Any?>).invoke(it)
suspend main 创建的简单协程会通过 createCoroutineFromSuspendFunction 来创建,createCoroutineFromSuspendFunction 的源码如下:
1
2
3
4
5
6
7
8
9
10
11
12
13
14
15
16
17
18
19
20
21
22
23
24
25
26
27
28
29
30
31
32
33
34
35
36
37
38
39
40
41
42
43
44
45
46
private inline fun <T> createCoroutineFromSuspendFunction ( completion: Continuation <T >, crossinline block: (Continuation <T >) -> Any ? ) Unit > {val context = completion.contextreturn if (context === EmptyCoroutineContext)object : RestrictedContinuationImpl(completion as Continuation<Any?>) {private var label = 0 override fun invokeSuspend (result: Result <Any ?>) when (label) {0 -> {1 this ) 1 -> {2 else -> error("This coroutine had already completed" )else object : ContinuationImpl(completion as Continuation<Any?>, context) {private var label = 0 override fun invokeSuspend (result: Result <Any ?>) when (label) {0 -> {1 this ) 1 -> {2 else -> error("This coroutine had already completed" )
可以看到当我们的 CoroutineContext 为 EmptyCoroutineContext 时,创建的是一个 RestrictedContinuationImpl 对象,RestrictedContinuationImpl 继承自 BaseContinuationImpl ,主要实现了 invokeSuspend 方法。invokeSuspend 方法实际是一个状态机实现,其中 label 作为状态变量控制状态机的状态转移,通过注释我们知道:
label 默认为0,当 invokeSuspend 方法第一次执行时,label 将会被设置为1,然后会调用我们的协程体代码,即 block,将 this 传入 ,并返回结果,这个结果可能是执行结果也可能是挂起标志。
当 invokeSuspend 方法第二此执行时,此时 label 为1,这种情况说明 block 发生了挂起,此时通过 result.getOrThrow 获取到的就是真正的执行结果,然后将结果返回。
若 invokeSuspend 调用时 label 既不为0也不为1,则说明协程被重复启动了,此时会直接抛异常。
到这里我们已经知道了 suspend main 创建的是一个 RestrictedContinuationImpl 对象,当调用 resume(Unit) 启动协程时,实际会调用到 BaseContinuationImpl#resumeWith 方法。
1
2
3
4
5
6
7
8
9
10
11
12
13
14
15
16
17
18
19
20
21
22
23
24
25
26
27
28
29
30
31
32
33
34
35
public final override fun resumeWith (result: Result <Any ?>) var current = this var param = resultwhile (true ) {val completion = completion!! val outcome: Result<Any?> =try {val outcome = invokeSuspend(param)if (outcome === COROUTINE_SUSPENDED) return catch (exception: Throwable) {if (completion is BaseContinuationImpl) {else {return
这里有一个while(true)循环,借助注释可以帮助我们理解:
This loop unrolls recursion in current.resumeWith(param) to make saner and shorter stack traces on resume.
这句话的意思是,此while循环可以帮助我们展开一些没有发生真正挂起的协程调用,相当于将递归转换成为了迭代,使得堆栈的跟踪更为简短和清晰。
来到循环内部,可以看到invokeSuspend 方法在这里被调用,那么协程体也会在此处执行,对应本例中的 CoroutineTestKt.main 方法,同时会将 this 传入,也就是说 CoroutineTestKt.main 中首次传入的参数为 RunSuspend#runSuspend 中创建的 RestrictedContinuationImpl 对象 。
接着分析协程的执行流程,如果 invokeSuspend 方法返回的是挂起标志 COROUTINE_SUSPENDED 的话,就会直接 return,使得当前while循环退出,等待 resumeWith 下一次被调用。这也是我们在使用 suspendCoroutine 挂起外部协程时需要调用 resumeWith 恢复协程执行的原因。
再次进入 resumeWith 后,invokeSuspend 返回的就是真正的结果了,此时会判断 completion 的类型:
如果 completion 为 BaseContinuationImpl 类型,说明此时的结束回调 competition 并不是真正的协程结束回调,那么就会更新 current 和 param 的值,循环继续。
如果 completion 不为 BaseContinuationImpl,例如本例中 RunSuspend 直接继承自 Continuation,说明协程执行完毕,则会调用 completion.resumeWith,然后return。
到这里协程的整个执行大致的流程就分析完毕了,下一节我们结合这个流程来分析例子的执行过程。
同步方式写异步代码的秘密 我们都知道 kotlin 协程可以以同步方式编写异步代码是 kotlinc 所做的”黑魔法“,但是具体是怎么做的,以及协程具体如何执行我们还是一概不知,而对协程 debug 也会经常出现代码与字节码不匹配的情况,因此要搞懂具体的原理还是要从字节码来入手。
继续看上节的例子:
1
2
3
4
5
6
7
8
9
10
11
12
13
14
15
16
17
18
19
suspend fun main () val token = requestUserToken(0 )"user token is : $token " )val userInfo = fetchUserInfo(token)"user info is : $userInfo " )suspend fun requestUserToken (userId: Int ) "faketoken" ))suspend fun fetchUserInfo (token: String ) 1000L )0 , "张三" )))data class UserInfo val userId: Int , val userName: String)
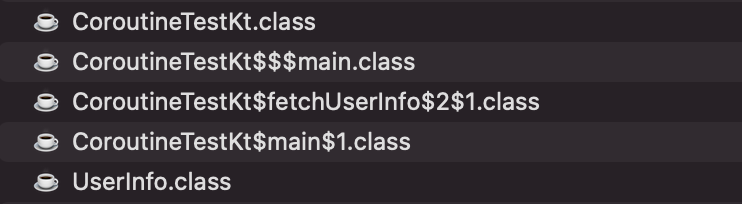
这段代码编译后生成了好几个 class 文件,如图所示:
根据上文的分析,通过这些文件名我们就可以猜到这些 class 文件的作用了。
TestKt.class:由 Test.kt 源码编译而来。
TestKt$$$main.class:由 Test.kt 中 suspend main Lambda 表达式编译而来,实际是 TestKt.main(非 Java 入口 main 方法)方法的装饰类。
TestKt$fetchUserInfo$2$1.class:对应 fetchUserInfo 方法中传递给 thread 方法的 block 代码块,实际上是一个Lambda。
UserInfo.class:由数据类 UserInfo 编译而来。
其中 TestKt$main$1.class 看命名似乎是由一个匿名内部类生成,它继承自 ContinuationImpl 并且实现了 invokesuspend 方法。
1 final class com .sukaidev .fuckingaosp .CoroutineTestKt $main $1 extends kotlin .coroutines .jvm .internal .ContinuationImpl
我们回过头来看看例子中的 CoroutineTestKt.main 方法,此方法字节码较为复杂,先将完整的贴出来:
1
2
3
4
5
6
7
8
9
10
11
12
13
14
15
16
17
18
19
20
21
22
23
24
25
26
27
28
29
30
31
32
33
34
35
36
37
38
39
40
41
42
43
44
45
46
47
48
49
50
51
52
53
54
55
56
57
58
59
60
61
62
63
64
65
66
67
68
69
70
71
72
73
74
75
76
77
78
79
80
81
82
83
84
85
86
87
88
89
90
91
92
93
94
95
96
97
98
99
100
101
102
103
104
105
0 : aload_04 : ifeq 39 7 : aload_011 : astore 6 13 : aload 6 20 : iand21 : ifeq 39 24 : aload 6 26 : dup32 : isub36 : goto 49 42 : dup43 : aload_047 : astore 6 49 : aload 6 54 : astore 5 59 : astore 7 61 : aload 6 66 : tableswitch { 0 : 92 1 : 118 2 : 179 default : 224 92 : aload 5 97 : iconst_098 : aload 6 100 : aload 6 102 : iconst_1109 : dup110 : aload 7 112 : if_acmpne 125 115 : aload 7 117 : areturn118 : aload 5 123 : aload 5 128 : astore_1132 : dup141 : aload_1148 : astore_2149 : iconst_0150 : istore_3154 : aload_2158 : aload_1159 : aload 6 161 : aload 6 163 : iconst_2170 : dup171 : aload 7 173 : if_acmpne 186 176 : aload 7 178 : areturn179 : aload 5 184 : aload 5 189 : astore_2193 : dup202 : aload_2209 : astore_3210 : iconst_0211 : istore 4 216 : aload_3223 : areturn227 : dup233 : athrow
为了方便阅读这里我直接翻译为 Java 代码,如下所示。
1
2
3
4
5
6
7
8
9
10
11
12
13
14
15
16
17
18
19
20
21
22
23
24
25
26
27
28
29
30
31
32
33
34
35
36
37
38
39
40
41
42
43
44
45
46
47
48
49
50
51
52
53
54
55
56
57
58
59
60
61
62
63
64
public static final Object main (Continuation completion) if (completion instanceof CoroutineTestKt$main$1 ) {1 ) completion;if ((continuation.label & Integer.MIN_VALUE) != 0 ) {break label27;new ContinuationImpl(completion) {int label;@Nullable @Override protected Object invokeSuspend (@NotNull Object o) this .result = result;this .label |= Integer.MIN_VALUE;return CoroutineTestKt.main((Continuation) this );switch (continuation.label) {case 0 :1 ;0 , continuation);if (resultValue == isSuspended) {return isSuspended;break ;case 1 :break ;case 2 :break label22;default :throw new IllegalStateException("call to 'resume' before 'invoke' with coroutine" );"user token is : " + token;2 ;if (resultValue == isSuspended) {return isSuspended;"user info is : " + userInfo;return Unit.INSTANCE;
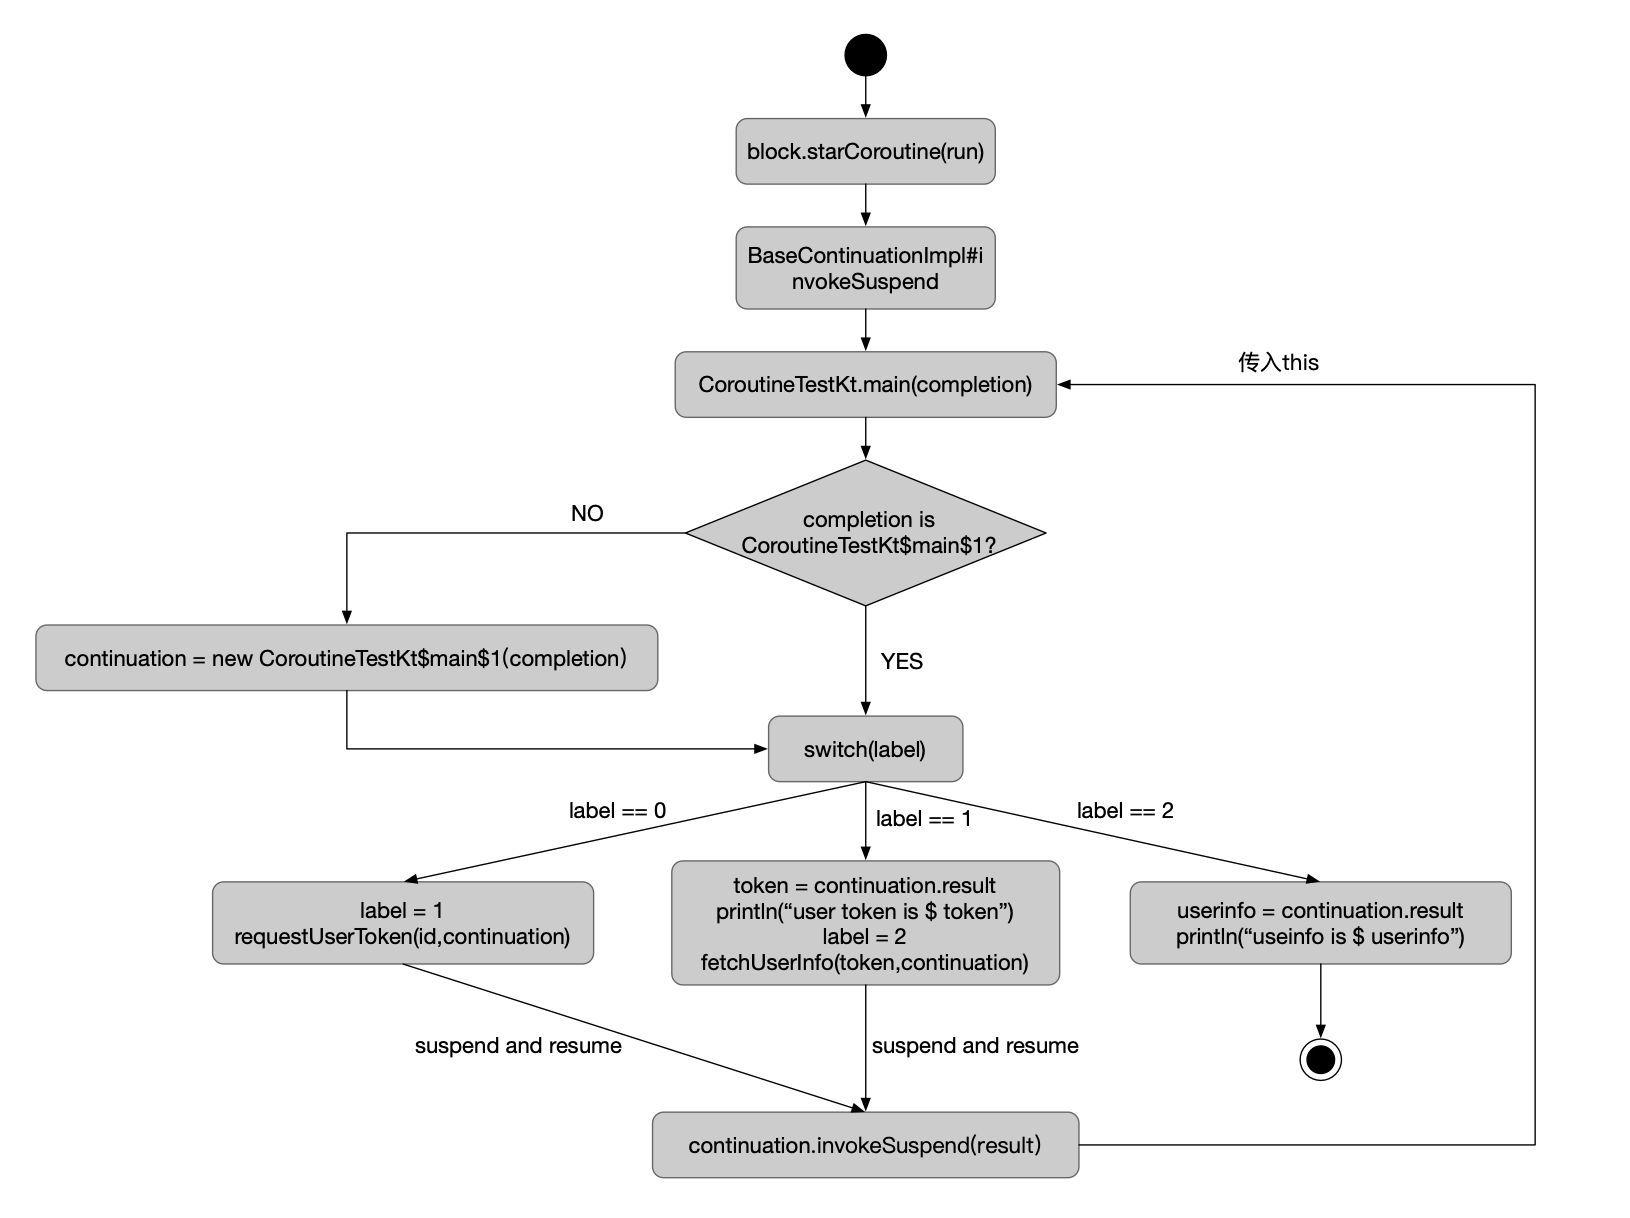
根据上面对于 suspend main 的分析,我们知道 CoroutineTestKt.main 方法(下文简称 main 方法)首次调用时传入的 Continuation 对象(即 completion )是由编译器帮我们构造的,下面我们就来手动跟踪协程的执行过程。
首次进入 main 方法,此时 completion 不是 CoroutineTestKt$main$1 对象,因此跳过第一个if判断。接着会通过匿名内部类的方式创建一个 ContinuationImpl(即CoroutineTestKt$main$1)对象(下文简称 continuation),并将最终的回调 completion 传入。此时状态变量 label 初始值为0 ,因此会进入 case 0 中执行 requestUserToken(userId,continuation),并将 label 更新为 1 。
requestUserToken 方法中创建了一个马甲 SafeContinuation,这个类在之前的文章讨论过,主要是用于保证协程只有在真正需要挂起时才会挂起。由于 requestUserToken 挂起了外部协程,此时返回的并不是真正的结果,而是一个挂起标志 COROUTINE_SUSPENDED ,main 方法中获取到这个挂起标志时将会直接返回这个标志,通知外部协程这里发生了挂起。
requestUserToken 执行完毕后调用 continuation.resumeWith 恢复协程执行,继而调用到 continuation.invokeSuspend 方法。invokeSuspend 方法中更新了 requestUserToken 的执行结果,将 label 更新为 label |= Integer.MIN_VALUE(-2147483647) ,并且重新执行了 CoroutineTestKt.main(this) 方法将自身传入。
重新进入 main 方法,此时的 completion 为 CoroutineTestKt$main$1 对象,因此会进入第一个 if 判断中,将 continuation 赋值为 completion,同时执行 continuation.label -= Integer.MIN_VALUE,label 被还原为1 。
进入 case 1 代码块中,获取到 requestUserToken 方法执行真正的结果 token的值,接着就会执行源码中后面一行非挂起的代码 ,即 println(“user token is : $token”)。然后**更新状态变量 continuation.label 值为 2,执行 fetchUserInfo(token,continuation)**。
fetchUserInfo 方法的执行与上面 requestUserToken 方法类似,同样的会先返回挂起标志,使得外部的 main 方法直接返回挂起标志。在 continuation.resumeWith 调用后更新 result 值,和label 的值,label |= Integer.MIN_VALUE(-2147483646),然后执行CoroutineTestKt.main(this) 方法。
第三次进入 main 方法,同样的先会还原 label 的值为 2 。进入 case 2 代码块中获取 fetchUserInfo 方法的真正结果 UserInfo 对象,并且这里会直接跳出 label22 代码块(break label22),避免重复执行。
执行剩余代码,打印 userinfo。
如果文字不够清晰的话,这里我画了一张图:
使用伪代码简化上面的流程就更容易理解了:
1
2
3
4
5
6
7
8
9
10
11
12
13
14
15
16
17
18
19
20
21
22
23
24
25
26
27
28
29
30
31
32
33
34
35
36
37
38
39
40
41
42
43
44
public void main (Continuation<Unit> completion) if (completion != ContinuationImpl){new ContinuationImpl(completion) {int label;protected Object invokeSuspend (@NotNull Object result) this .result = (Result) result;return main(this );if (continuation.label == 0 ) {1 ;0 , new SafeContinuation<String>(continuation) {@Override public void resumeWith (@NotNull Object result) super .resumeWith(result);if (label == 1 ) {int token = result.value;"user token is : " + token);2 ;new SafeContinuation<UserInfo>(continuation) {@Override public void resumeWith (@NotNull Object result) super .resumeWith(result);if (label == 2 ) {"user info is : " + userInfo);
可以看到整个协程的执行实际与我们平时写的回调方式其实是大同小异的。
总结 现在我们可以总结一下 Kotlin 协程为何可以解决回调地狱了,主要基于以下几点:
整个协程是采用了一种状态机(State Machine)模式 ,协程体中所有代码被编译到状态机中,由一个状态变量 label 来判断状态机此时的状态。
挂起函数在编译后会有一个隐藏的 Continuation 类型参数,它对应我们平时写的 Callback。这个参数中保存了状态变量以及每次执行挂起恢复的结果,当状态机发生状态流转时需要将此参数传递进去。
每次挂起函数想要恢复协程的执行都需要重新执行状态机,通过更新 label 的值来进行状态机的状态转移,继而能够执行不同的代码块获取执行结果。
参考