前言 今天Android Studio推特放出了Android Studio 3.6 Canary 11的更新日志 ,终于是在IDE层面支持了View Binding 。
View Binding大家肯定都用过,常用的有Data Binding、ButterKnife和Kotlinx,一般来说Java项目中ButterKnife用的多,kotlin项目的话kotlinx synthetic用起来更快、更方便。那这个IDE支持的View Binding 有何优势呢?待会说,先看看它怎么使用吧。
使用方法 首先需要在模块中启用View Binding,这个跟Data Binding类似,毕竟都是官方支持的:
1
2
3
4
5
6
android {true
这样的话编译器就会为这个module中的每个xml文件生成一个binding class ,例如activity_main.xml文 件会自动生成ActivityMainBinding.java 文件。每个binding class 会持有根视图的引用,并且会为每个View生成一个ID(除非这个View没有设置ID)。
例如我写一个result_profile.xml :
1 2 3 4 5 6 <LinearLayout ... > <TextView android:id ="@+id/name" /> <ImageView android:cropToPadding ="true" /> <Button android:id ="@+id/button" android:background ="@drawable/rounded_button" /> </LinearLayout >
IDE会自动生成一个叫ResultProfileBinding.java 的文件,文件中有两个属性:名为name的TextView和名为button的Button,ImageView因为没有设置ID所以不会引用到文件中。除此之外还提供一个getRoot()方法,返回根视图,这里的话就返回LineaLayout对象。
有人说那我有的xml文件不需要用、不想用怎么办呢?也行,让tools:viewBindingIgnore = true就行。
1 2 3 4 5 <LinearLayout</LinearLayout >
接下来就是要到Activity中去使用它了,setContentView 中肯定不能直接使用xml文件Id了,应该传入一个根视图。要获取这个根视图的话,首先要拿到ResultProfileBinding 类的对象,我们可以通过其静态方法*inflate()*来获取对象。这样的话代码就应该这样写了:
1
2
3
4
5
6
7
8
private lateinit var binding: ResultProfileBinding@Override fun onCreate (savedInstanceState: Bundle ) super .onCreate(savedInstanceState)
接下来就可以这样访问视图控件了:
1
2
binding.name.text = viewModel.name
原理分析 ResultProfileBinding类由Android Studio自动帮我们生成,通过编译器的全局搜索功能我们可以在app/build/generated/data_binding_base_class_source_out/debug/out+我们的Activity对应包名路径+databinding目录下找到此文件。
生成的代码如下所示:
1 2 3 4 5 6 7 8 9 10 11 12 13 14 15 16 17 18 19 20 21 22 23 24 25 26 27 28 29 30 31 32 33 34 35 36 37 38 39 40 41 42 43 44 45 46 47 48 49 50 51 52 53 54 55 56 57 58 59 60 61 62 63 public final class ResultProfileBinding implements ViewBinding @NonNull private final LinearLayout rootView;@NonNull public final Button button;@NonNull public final TextView name;private ResultProfileBinding (@NonNull LinearLayout rootView, @NonNull Button button, @NonNull TextView name) this .rootView = rootView;this .button = button;this .name = name;@Override @NonNull public LinearLayout getRoot () return rootView;@NonNull public static ResultProfileBinding inflate (@NonNull LayoutInflater inflater) return inflate(inflater, null , false );@NonNull public static ResultProfileBinding inflate (@NonNull LayoutInflater inflater, @Nullable ViewGroup parent, boolean attachToParent) false );if (attachToParent) {return bind(root);@NonNull public static ResultProfileBinding bind (@NonNull View rootView) int id;if (button == null ) {break missingId;if (name == null ) {break missingId;return new ResultProfileBinding((LinearLayout) rootView, button, name);throw new NullPointerException("Missing required view with ID: " .concat(missingId));
可以看到原理还是很简单的,生成的这个类内部持有了我们在xml中定义的所有节点View,并且也是通过调用findViewById来获取这个实例。
对比 有人问:Java我有ButterKnife,Kotlin我有Kotlin Synthetic,这东西现在放出来有啥用?
这东西对比findViewById,优势肯定是很明显的,首先控件都是从自动生成的java文件中取出的,不会因为写错了R文件ID而出现空指针问题。其次类型也是确定的不会有类型转换异常。
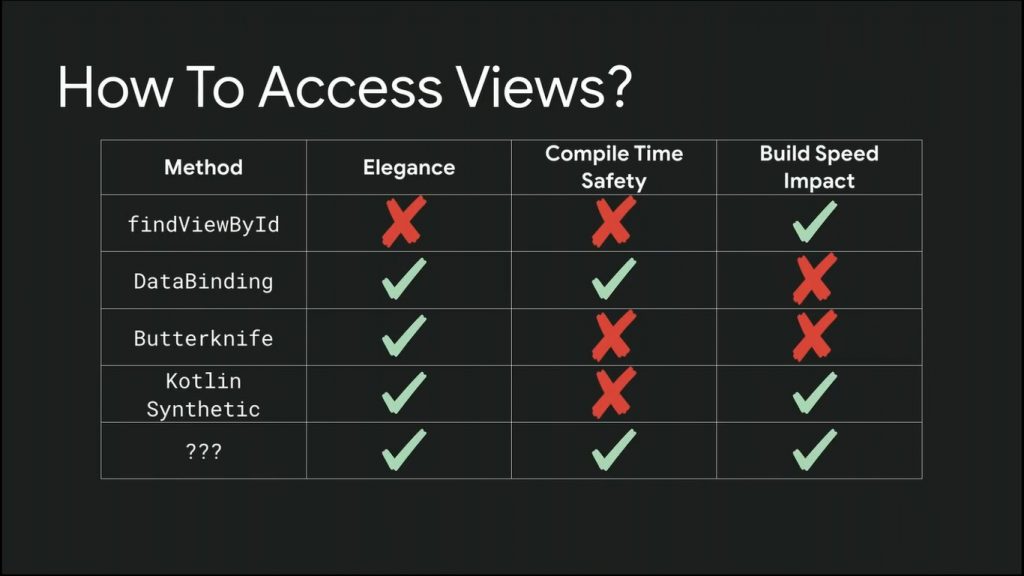
但对于ButterKnife和kotlinx用习惯的人来说,看起来这新功能并不如前两者。但事实呢?来看一张图:
上图列出了访问视图控件的五种方式的对比。除了最后一个,其他四种方式或多或少都有自己的劣势。例如ButterKnife是基于注解和注解处理器来实现视图绑定的,它的劣势就在于无法保证编译期安全,写错一个视图控件的R文件Id就可能导致程序崩溃,一旦项目大了注解写的多了,就会极大的影响项目构建速度。而kotlinx虽然不会影响项目构建,但也无法保证编译期安全,有时候相同ID的控件多了导包都要看半天,生怕导错了包然后运行报错。
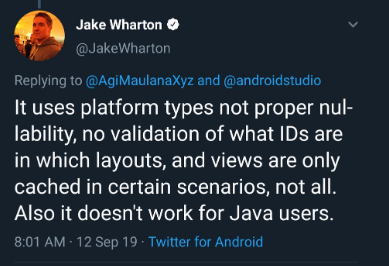
对于 why kotlin doesn’t better 这个问题,Jake Wharton是这么回答的:
看来巨佬跟我一样烦kotlinx的导包问题,嗯,总算找到点共识。

